Educational
Studio Monitors 101 – What to look for (in 2024)
Palmer Germany
Publisher

09.01.2024
Last Update
Today, we aim to provide a comprehensive guide on Studio Monitor Speakers!
We'll delve into key distinctions that separate studio monitors from regular speakers, consider whether active or passive monitors are more appropriate for your needs, and explore the importance of monitor size.
We'll also delve into budget considerations, as it's crucial to understand how much you should ideally invest in these pieces of equipment. We promise to offer the most definitive and current information on all these topics and more. Let's dive in!
If you're the kind of person who likes to jump straight to the dessert of a three-course meal, then this TL;DR is just for you:
Summary (TL;DR)
Studio monitor speakers differ from regular speakers due to their flat frequency response, making them more accurate for reproducing sound. Most of them have two loudspeakers (two-way design): a woofer for low frequencies, a tweeter for high frequencies. High-end models host a supplementary loudspeaker (three-way design), dedicated to medium frequencies.
There are active monitors and passive monitors. Active monitors have built-in amplifiers and are simpler to use, while passive monitors require external amplifiers, offering more flexibility.
Amplifier configurations matter: single-amp is the most common setup for passive monitors. On active monitors, bi-amp provides better control over frequency by having dedicated amp channels for each driver. On three-way models, tri-amp configurations offer the most flexibility to optimize the reproduction of audio. Size of studio monitors should align with your room size and music style, with 5-inch woofers being a good fit for home studios.
Wattage is significant for sound levels without distortion; for beginners, 50-75 watts per channel is a good start. Regarding cost, beginners can find decent monitors for around $200-$400, intermediate users should expect to spend $400-$1,000, and professionals might spend upwards of $1,000 per monitor.
Alright, TL;DR crew, hope you enjoyed the dessert!
Now, for those who like their bass as deep as their monitor knowledge, let's dive into the nitty-gritty!
Studio Monitors vs Hi-Fi Speakers
Studio monitors (some call them studio speakers or reference loudspeakers) are specifically designed for use in recording studios and at radio stations and other professional audio environments.
They're used to mix music, dialogue, and sound effects during the recording, mixing, and mastering process.
Regular Hi-Fi loudspeakers are designed for both home and car audio systems, as well as entertainment venues like clubs and bars. They’re the go-to choice for playing back music and other audio for music enthusiasts to enjoy.
So, this was the basic answer - now let’s look at the biggest differences from a more technical point of view!
Frequency response
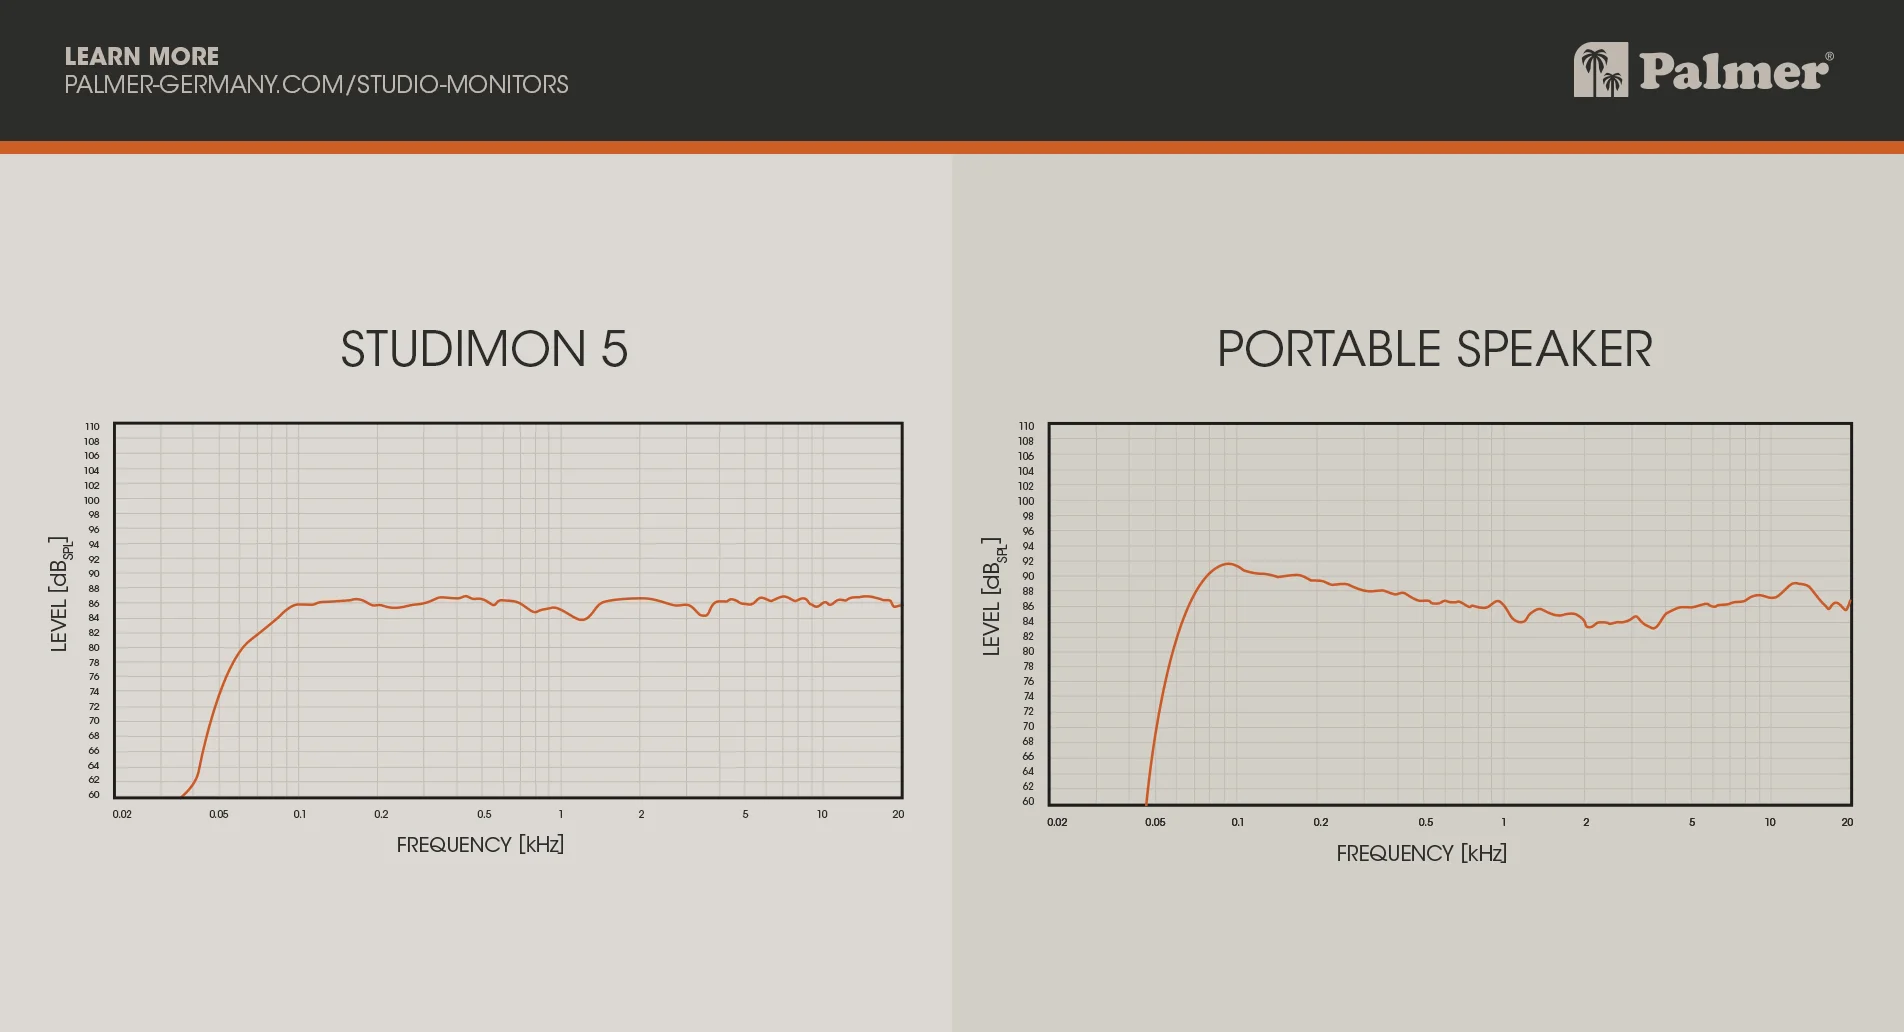
Studio monitors are designed to have a flat frequency response.
What does that mean?
It’s simple: it means that all frequencies are played at the same volume level.
In contrast, regular Hi-Fi speakers are "biased" and altered to emphasize certain frequencies, such as adding more bass to music.
Here, you can see the frequencies of our Studimon 5 Studio Monitors compared to a regular Hi-Fi speaker (portable outdoor speaker):
What is the reason for wanting all frequencies to be played at an equal volume level?
Answer: to accurately balance the levels of different frequencies in the audio, which is really important when mixing.
Let’s look at an example to understand why:
A Hi-Fi outdoor speaker might emphasize bass frequencies to give the audience a more vibrant, party-like feel. It may also boost treble frequencies to make the music sound crisp and clear, even in an open space. The objective here is to create an enhanced and enjoyable listening experience, which often means altering or 'coloring' the sound to some extent.
Now, imagine trying to use these speakers in a recording studio. Here, you're working to create a balanced, neutral mix that will sound good on all sorts of playback systems – from a high-end stereo to a car radio, earbuds or even smartphones.
If the speakers are boosting the bass and treble, you might be tricked into thinking your mix is well-balanced, when it's actually not. You might compensate by reducing those frequencies in your mix, and then it won't sound right on other systems.
That's why studio monitors aim for a flat frequency response to give a true representation of the sound, ensuring accurate mixing and mastering.
And, speaking of accuracy...
Accuracy
Studio Monitors are as accurate as possible when it comes to reproducing frequencies put into them.
In contrast, outdoor party speakers are designed to create a lively atmosphere and impress people, so a perfectly balanced audio response is not necessary.
Instead, these speakers are designed to deliver a higher level of bass and keep up with a potential crowd - which is absolutely not a scenario you plan to have with studio monitors!
Instead, with studio speakers, engineers need to make informed decisions about how the audio will sound, and the process will take place in a studio (either a home studio or a professional one), where the speakers are fixed in position.
And, speaking of fixed positions…
Accuracy does depend, to a bigger extent than we would like, on the placement and listening position of the speakers and the listener.
So, let's talk about that for a moment.
Placement and listening position
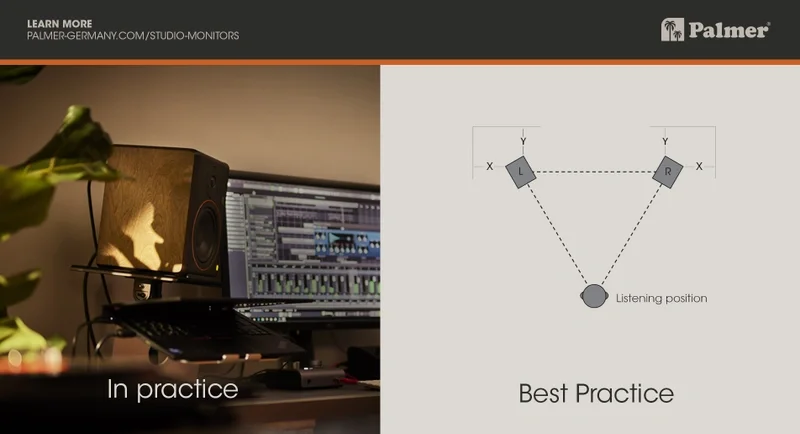
Studio monitors are usually placed on stands or a mixing console, and the listener is usually seated a few feet away from them, with the speakers generally being positioned at the height of the listener’s ears.
This allows the engineer to hear the audio in a relatively neutral listening environment.
When buying our Studio Monitors, the Studimon 5, we provide a picture of how we recommend you to place them.
Here’s the image and a real life setup example:
Studio Monitor Stands
It's worth noting that an integral part of this positioning is the stand your monitors rest on.
Gravity studio monitor stands, for instance, have been a popular choice among many audio professionals.
Truth be told, we've got a bit of a bias here, as we're part of the same family as Gravity, a renowned brand that produces high-quality studio monitor stands.
However, we can promise you authentic and transparent advice: the stability and vibration reduction provided by a good stand can significantly influence your sound experience.
They offer robust construction for stability, foam padding for vibration reduction, and flexible adjustments to fit your personal studio setup. Designed with attention to detail and the needs of audio engineers in mind, they truly help to enhance the accuracy of the sound you're hearing from your monitors.
By positioning your audio sources as shown in the image above and ensuring they are securely placed on quality stands like the one by Gravity Stands, you can achieve perfect audio precision.
In contrast, if you point the speakers more broadly into the room - and don’t direct them towards your own ears - you will only capture fragments of the direct sound waves, as the remaining portions will bounce off walls or other surfaces, potentially distorting the sound.
This is somewhat different with regular Hi-Fi speakers.
They are designed to project sound in a broader direction, so their positioning in the room is not as critical as with directional or high-precision audio equipment.
For example, bookshelf speakers or floor-standing speakers can be placed in various locations around the room without significant sound quality degradation.
That does not mean that where you position Hi-Fi speakers is completely irrelevant, of course - even with a party box, you should still pay attention to their placement to get the best sound results for your needs.
Now that we’ve covered some basic knowledge about studio monitors compared to regular speakers, let's dig deeper into how you can choose the right monitors for YOU.
2-way or 3-way design?
Imagine trying to play every single note on a piano using just one key. Sounds impossible, right?
That's similar to expecting a single speaker to handle the entire range of sounds we can hear, from the deep bass at 20Hz all the way up to the high pitches at 20kHz. Most speakers that try to do it all, called 'full-range' speakers, struggle with the very low sounds (below 100Hz) and the very high sounds (above 5kHz).
To tackle this, speaker designers use a team approach. They bring in a woofer, which is like a strong player in the bass section, handling the deep and mid-low sounds. Then, they add a tweeter, a specialist in the high and mid-high sounds.
They usually decide to hand off the sounds from one to the other at a point called the crossover frequency, which is typically between 1.5 to 2.5kHz. Around this handoff point, both the woofer and tweeter work together to blend the sound smoothly.
This setup is pretty smart. It's like having a compact, cost-effective band that can cover a wide range of music. However, there's a catch. When it comes to the middle range of sounds, where a lot of the action happens (think vocals, guitars, keyboards), having two different speakers handling this can lead to a mix-up, making some sounds less clear or precise.
This is because the woofer and tweeter are trying to play the same notes from different spots on the stage, and sometimes their sounds don't blend perfectly.
The introduction of a third component, a midrange speaker, in a 3-way system, dedicated solely to those crucial middle sounds (around 500Hz to 3kHz), offers a solution by eliminating the mix-up and enhancing clarity. It's an approach that aims for the pinnacle of sound quality by ensuring a dedicated path for each range of sound.
However, this is not to say that 2-way speakers don't have their place. In fact, they are widely appreciated for their balance of quality, cost-effectiveness, and simplicity. These systems are particularly adept at providing a rich listening experience for a wide audience, including beginners and semi-professionals. The choice between a 2-way and a 3-way system often comes down to the listener's specific needs, preferences, and the spaces in which they will be used.
For casual listeners and home enthusiasts, 2-way speakers offer a perfect blend of quality and affordability, making them ideal for enjoying music and movies with ease. Amateur musicians and semi-professionals also benefit from the straightforward yet effective sound profile of 2-way speakers for home studios and creative projects.
Meanwhile, audiophiles and audio professionals, with their keen ear for detail, might prefer the nuanced clarity and depth of 3-way speakers, particularly for tasks demanding the highest fidelity in sound reproduction.
Another important question you should get out of the way is:
Active or Passive Studio Monitors?
First, let's define the terms.
Active studio monitors have built-in amplifiers, which means you don't need an external amplifier to use them. Passive monitors, on the other hand, don't have built-in amplifiers and require an external amplifier to work.
So, which one should you choose?
To be honest, it really depends on your needs and preferences.
Here’s why:
If you want an easy, plug-and-play solution that's reliable and accurate, active monitors might be the way to go.
They're simple to set up and don't require any additional equipment (i.e. an amplifier and cables), which means you can get started right away. Plus, the built-in amplifiers are specifically designed for - and tuned to - the monitors, which can lead to better overall sound quality.
On the other hand, if you want more flexibility and are willing to put in a little extra effort, passive monitors might be the better choice.
Since they don't have built-in amplifiers, you can choose an external amplifiers to find the perfect match for your monitors.
Setting up Passive Studio Monitors:
Amplifier: Passive studio monitors require an external amplifier. Ensure the amplifier matches the power rating and impedance of your monitors for optimal performance.
A Mini-Guide on how to match the right power rating and impedance (Click to open)
Speaker Cables: Connect your passive monitors to the amplifier using high-quality speaker cables to minimize signal loss and interference.
Audio Interface or Mixer: This device allows you to plug in instruments, microphones, or other audio sources. It converts analog signals to digital for your computer and can also act as a preamp.
Balanced Cables (TRS or XLR): Use these cables to connect your audio interface to the amplifier. They help in minimizing noise and interference, especially over long distances.
Setting up Active Studio Monitors:
Audio Interface or Mixer: Active monitors can be connected directly to an audio source. An audio interface allows you to plug in instruments, microphones, or other audio sources. It converts analog signals to digital for your computer, and vice versa.
Balanced Cables (TRS or XLR): Connect your audio interface or mixer to the active monitors using balanced cables. These cables minimize noise and interference.
Power Cables: Since active monitors have built-in amplifiers, they need power. Ensure each monitor has a connection to a power source using the proper power cables.
Stands or Isolation Pads: For the best sound quality, ensure your monitors are on stands or isolation pads. Stands position the monitors at ear level and aimed towards your listening position, while isolation pads help reduce vibrations.
Studio Monitor Controller (optional): A monitor controller allows you to easily switch between different audio sources, control volume, and sometimes even offers additional features like mono checking or talkback. It's a centralized control unit, especially useful if you have multiple sets of monitors or sources.
As you are most likely just getting familiar with studio monitors, you’ll probably have decided to start with active ones. In this case, it's important to note that there are variations in the way they are set up in terms of their amplifiers.
Let's explore them:
Amplifier Configurations: Single-Amp, Bi-Amp, and Tri-Amp Options
When it comes to powering studio monitors, there are several amplifier configurations to choose from: single-amp, bi-amp, and tri-amp. Each configuration offers different benefits and is better suited for different types of setups.
Single-Amp Configuration: This is the simplest setup for active studio monitors. In a single-amp configuration, the left and right speakers are powered by a single amplifier, integrated in one of them. This configuration is rarely used in studio monitors, but common for computer speakers.
Bi-Amp Configuration: In a bi-amp configuration, there are two amplifier modules in each speaker. In a 2-way design, each driver has its own dedicated amplifier. This setup allows for greater control over the frequency response and more precise sound reproduction.
Bi-amp configurations are often used in professional studios, where accuracy and detail are essential.
There are some 3-way speakers integrating two amplifier channels. One of them powers the woofer, the other one powers the midrange speaker and the tweeter, through a passive filter. This is not the best way to amplify 3-way systems.
And of course, the most precise option is - you probably already guessed it - the Tri-Amp configuration.
Tri-Amp Configuration: Tri-amp configurations are the most advanced and complex of the three configurations.
In a tri-amp setup, each driver in a 3-way speaker (woofer, midrange, tweeter) has its own dedicated amplifier (low, mid, and high frequencies).
This setup provides the ultimate control over the frequency response and allows for the most precise sound reproduction. Tri-amp configurations are typically used in high-end professional studios, where the highest level of accuracy is required.
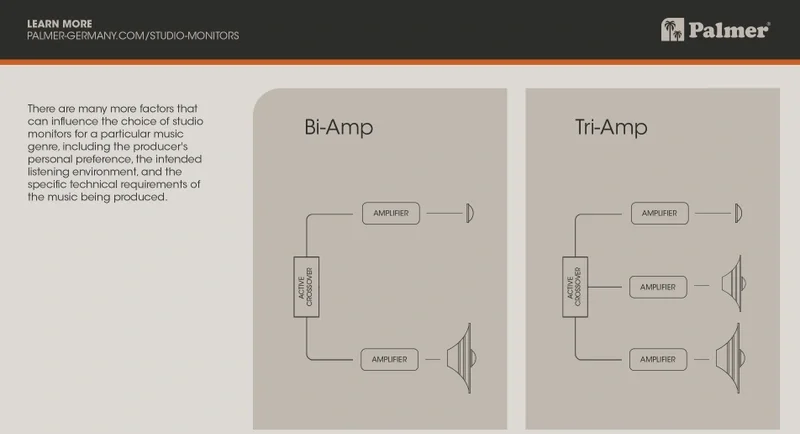
We made the decision to design our first studio monitors with a bi-amp configuration, as we aimed to achieve a higher level of precision compared to the more standard single-amp setups, while still making it accessible to a wider range of users rather than solely serving to high-end professionals.
What size should my studio monitor speakers be?
Or, to put it another way: what driver size is recommended or appropriate?
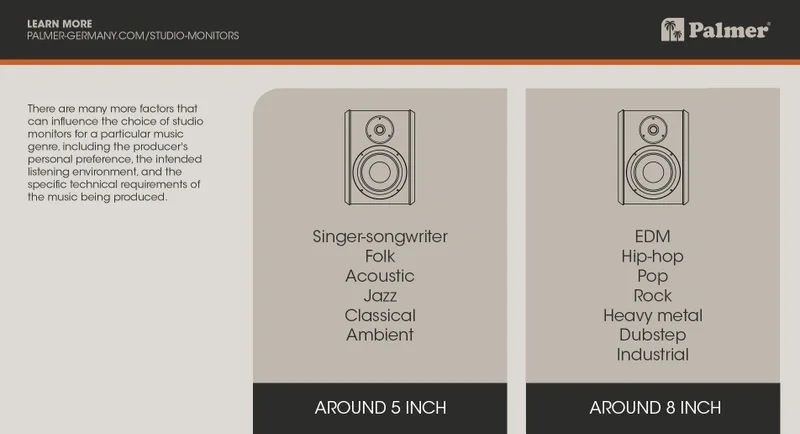
For home studios, and therefore the majority of people, 5-inch speakers are a really good fit. That was also why we went with 5-inch speakers for our own monitors.
The size of the studio monitor driver is not only dependent on the room size, but also on the music style you work with.
If you are an EDM music producer, for example, you will require better low-frequency response, and therefore, a bigger driver size would be more suitable. This is because larger speakers are capable of moving more air, which is necessary for reproducing lower frequency sounds.
On the other hand, smaller speakers may offer better midrange and high frequency response, as they can reproduce these frequencies more accurately due to their smaller size.
If we had to categorize the music genres into recommendations for the size of studio monitors, it would look like this:
That being said, it's important to note that speaker size is not the only factor that determines sound quality.
Other factors, such as driver quality, amplifier power and speaker placement, can all have a significant impact on the overall sound of your studio.
Now, close to the question about the driver size is also the topic of wattage. So, let's talk about that for a moment.
How much wattage should my monitor speakers have?
Wattage, an important factor, determines the monitor's ability to deliver adequate sound levels without distortion.
In short: if you're just starting out or working in a small-to-medium sized room, a studio monitor with 50-75 watts per channel should do the trick. But, if you're in a big commercial studio, you might want to consider something with a little more juice, like 100 watts or more per channel.
Now, here's the thing.
Just because a studio monitor has a high wattage, doesn't mean it's the best option.
Quality is key, and a well-designed, high-quality studio monitor with a lower wattage rating can often sound better than a cheaper one with a higher wattage rating.
So, how do you know what's right for you?
The best way to find out is to test your monitors in your room and listen to your material on them. If they can produce the sound pressure level you need without any distortion, then you're good to go. If you need more volume, then you might want to consider a higher wattage rating.
For the same reason as with the bi-amp decision - to reach a broader range of potential users - we went with a 60-watt configuration for our Studimon.
But really, what is wattage? Let's break it down into 3 key aspects:
- Definition: The wattage of a studio monitor refers to its power rating, specifically how much electrical power it can handle and produce as sound. This is often provided as a measure in watts (W).
- Volume Levels: A higher wattage generally means that a monitor can produce higher sound levels. If you're working in a larger room or need to reference your mixes at louder volumes, having monitors with higher wattage is beneficial.
- Headroom: One of the most critical aspects of wattage in studio monitors is headroom. Headroom is the difference between the typical operating level of a piece of audio equipment and the maximum level it can handle without distorting. Monitors with higher wattage will typically have more headroom, meaning they can handle sudden spikes in volume (like a loud drum hit) without distorting.
How much should I spend on studio monitors?
In short:
A general guide is to spend $200-$400 for a first good set of monitors which will last you for a good while. Then, you can expect to progress to about $400-$1,000 for a next level set, and upwards of $1,000 for a professional set.
Here’s why:
If you're just starting out or have a limited budget, you can find a decent set of studio monitors for around $200-$400. These monitors will typically have an average wattage rating and may not be as accurate as more expensive models, but they will provide a good foundation for your setup.
Assuming you are already equipped with such speakers and looking for the next level when it comes to precision and quality of your sound, you should expect to spend between $400-$1,000.
These monitors will typically have a higher wattage rating and offer better frequency response and sound reproduction.
Now, as with everything, just because something has a high price tag, it doesn't guarantee high quality. You should still do your due diligence and compare products within that price range.
Professional Level: if you're a professional engineer or working in a commercial studio, you may want to invest in a high-end set of studio monitors, which can cost upwards of $1,000 per monitor speaker.
These monitors will typically have a tri-amp configuration and offer the ultimate control over frequency response and sound reproduction. You can expect the highest quality components, such as custom-designed speaker drivers, precision crossover networks, and high-quality power amplifiers.
Closing thoughts
Having explored the core aspects of studio monitors, we hope you now have a more comprehensive understanding to guide your decisions, whether you're looking for your first set or wanting to upgrade to the next level. From the distinctive features of studio monitors compared to regular speakers, understanding the implications of active and passive monitors, to grasping the benefits of different amplifier configurations, and identifying the right size and wattage for your needs, it's clear that many factors come into play.
Budget considerations are also paramount, but remember, don't just judge by the price tag; quality and compatibility with your needs are essential.
In creating the Studimon 5, we aimed to balance these considerations, offering a high-quality, bi-amp configured, active studio monitor that delivers precision and performance for a wide range of users.
We hope that whatever monitors you choose, they will enable you to delve deeper into your music, revealing details, subtleties, and colors you've never heard before.
After all, in the end, it's all about the love of sound, the pursuit of accuracy, and the joy of creating music. Happy mixing! ❤️
